Summary
The eight disciplines (8D) methodology is often used to deal with recurring problems, from identification to elimination. It is meant to yield a permanent resolution by drilling down to a problem’s origins and determining its root causes. Usually, the analysis is quantitative and the corrective actions are revealed by statistical analysis – but depending on the domain of application, a qualitative approach is also possible. This blog post gives tips on how to carry out an 8D analysis in a meeting-room workshop using the template included in the free FlatFrog Board whiteboard app.
Running a successful 8D workshop
PHASE 1
One key to a successful 8D workshop is pre-planning by the manager/person raising the issue. This is sometimes called the ‘0D’step. The manager does a preliminary identification of the problem and considers the presumptive prerequisites for its solution. These do not have to be 'correct to the last detail’ but are crucial for bootstrapping, which leads to the first step.
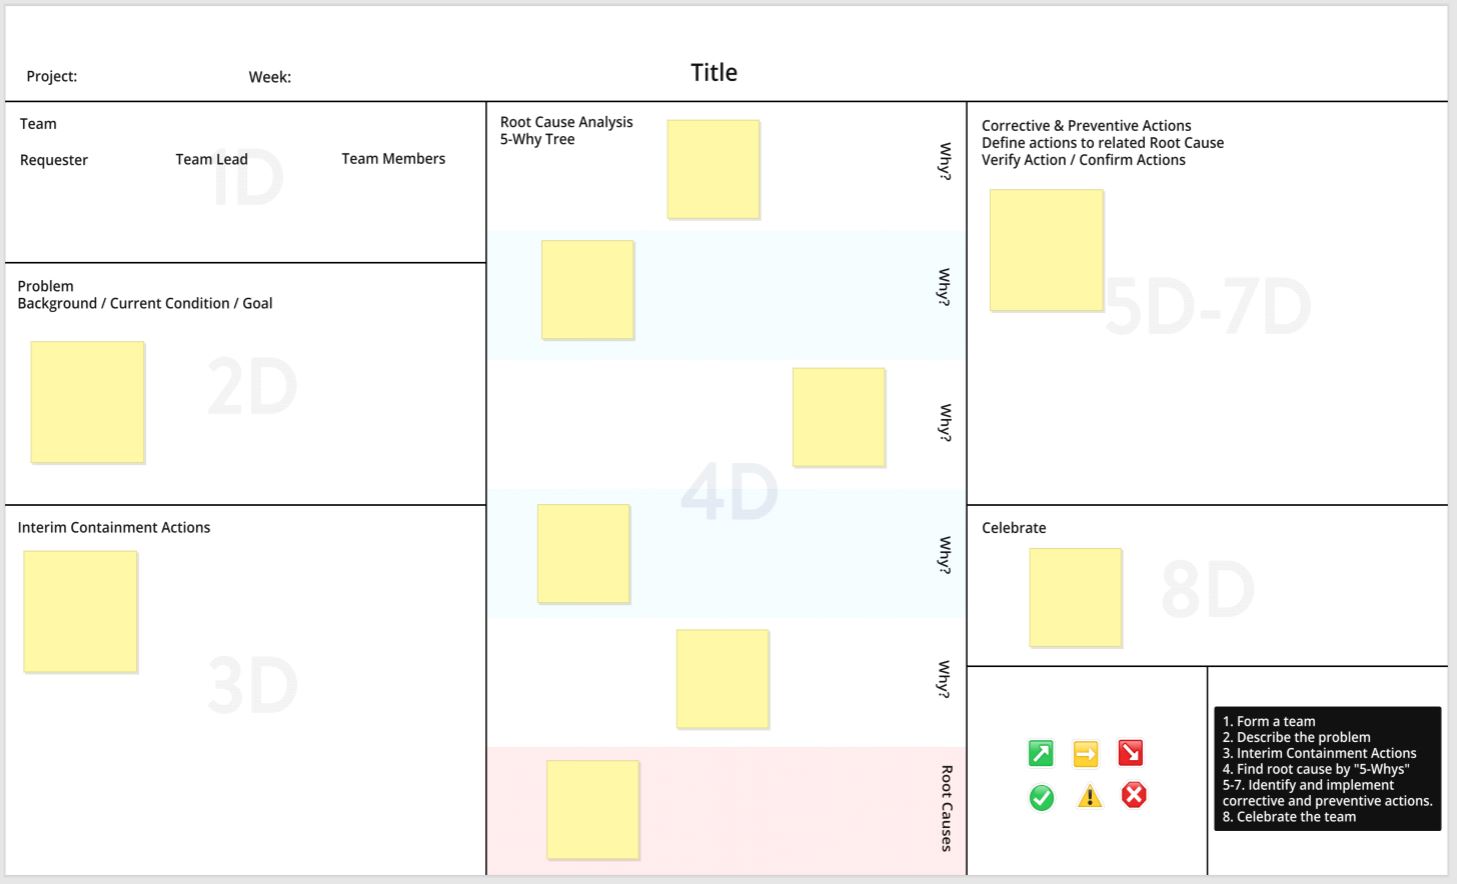
Step 1D is the initial selection and establishment of a team with relevant process/product knowledge. The team must initially be somewhat small and highly focused, so it’s important to carefully select appropriate members. The template contains a list of the initial team, whose members receive information about the scope of the problem. To allow time for reflection, it is important to provide a good outline of the problem well in advance of the workshop.
Step 2D is the first step undertaken in the meeting room workshop: defining and describing the problem as a whole team. (Please also refer to the 7 tips for running a successful workshop.) Note that 8D is not a fuzzy brainstorming session. The resulting problem definition and description must ideally be precise and detailed enough to accommodate quantitative causal analysis. It’s crucial to exhaustively state the background, current conditions and goals.
The role of the facilitator or meeting convenor is to identify any fuzziness and push the team to render precise specifications, ideally resulting in quantifiable variables. One way to do this is to have the participants think through “who, what, where, when, why, how and how many” for the problem. This helps with the next step as well. To get a satisfactory problem identification, it may be necessary to call in additional members at this stage.
Step 3D is the intermediate containment option. Provided that the background, current conditions and goals have been comprehensively and precisely specified, it should be possible for the team to identify interim ways of containing the severity and extent of the problem, even before identifying the root causes.
This would be a natural point to take a break in the workshop. This could be a short break or one that requires reconvening the team after the developed intermediate containment solutions have been immediately implemented and verified to provide an adequate stop-gap solution.
PHASE 2
Step 4D, undertaken after the break, is the analytical identification and verification of the problem’s root causes. The template provides for the 5 Whys approach. By repeating the ‘Why’ question 5 times, it is possible to drill down to the root causes. It’s also helpful to add the ‘Why Not’ question at the end, namely, why was the problem not noticed earlier? This may help with subsequent steps.
It is also possible to use a root-cause analysis following the 5-Why exercise. Note that a template for Root Cause analysis, aka ‘Fishbone analysis,’ is also available on the free online whiteboard app from FlatFrog. It’s ideal to state the identified causes in operational terms suitable for quantitative verification. Again, additional expertise may be required to get the root cause nailed down at this stage.
Step 5D involves choosing and verifying the permanent corrective measures now that the root cause of the problem has been identified. Ideally, the verification should again be quantitative, with causal modeling used to determine whether the corrective action affects the problem variable in the desired way. The best corrective measures are then recommended for implementation.
In addition, based on the ‘Why Not?’ question, the team can recommend implementations of preventative measures to ensure non-recurrence of the problem. At this stage, there can be another break, possibly of a longer duration while the correctives are implemented. This depends on the nature and extent of the correctives.
PHASE 3
Step 6D involves the implementation of the corrective action and real-world verification that it is working. This is undertaken by executive management, on recommendation by the team.
Step 7D also involves management, which is required to put systemic and procedural changes in place and prevent recurrence of the problem. The team can reconvene to evaluate the implementation once it is complete.
Step 8D, coming at the formal conclusion of the workshop, is team recognition for resolving the problem and thanks from the organization and managers.
Additional resources:
How can online whiteboard templates help your meeting? - https://www.flatfrog.com/post/whiteboard-templates-improve-meeting.
Whiteboard for hybrid work - https://www.flatfrog.com/post/hybrid-whiteboard-and-how-it-can-help-your-team.
List of templates- https://www.flatfrog.com/templates.
Workshop use case - https://www.flatfrog.com/use-cases/free-online-workshop-board.
About FlatFrog
FlatFrog is a provider of free online whiteboards (app.flatfrog.com).
FlatFrog has also designed patented InGlass™ touch display technology from the ground up, providing the best pen and touch input to mimic the intuitive feeling of a dry-erase board. InGlass™ touch displays are available through our partners, including Dell, Google, Samsung, SMART, Sharp, Ricoh, Avocor, CTOUCH and more (www.flatfrog.com/partners).


